These last several weeks I’ve been flattered to have email, Instagram and Twitter dialogues with community members wondering how I do my makeup. Suffice to say that my makeup application skills have been steadily improving since mid-2013, and I have NARS to thank for it! The requests for my skincare and makeup routine have been piling up so I decided it best to make a post all about what I do, what I’ve learned, and what I use.
Before I delve in I want to mention that NARS is an Effortless Anthropologie sponsor that purchases banner ad space, however this post is not a sponsored post. I connected with NARS last winter in the best way possible: organically. I’d heard of the brand before because they do the makeup for several New York Fashion Week shows every go-round, most notably Marc Jacobs shows because he and Mr. NARS are good friends.
Along with a few friends I went to the NARS Bleecker St boutique last winter to have our makeup done before a wedding. I was thrilled with the results! During my makeup appointment I lamented that my own skills with brush and such were completely lacking. The stylist I worked with invited me to come back so he could create a daytime look for me.
His offer was thrilling but I demurred for a few months. I wasn’t interested in investing a ton of money into makeup — kind of a waste, I thought. But as time passed I couldn’t help but stroll by the boutique every so often or stop by the NARS counter in department stores. Always willing to invest money in my clothing to look fab, or my hair to sit just so, for whatever reason I seemed to have a mental block when it came to my makeup.
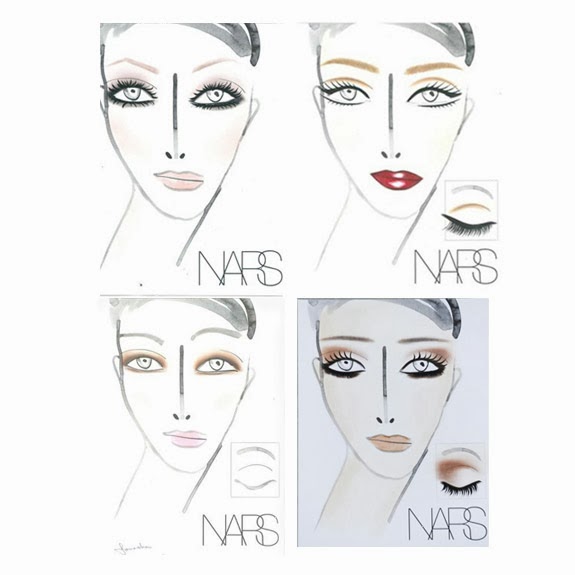
Finally in the summer of last year I was so totally over buying drugstore stuff or expensive name brand stuff that wasn’t working. I went back to 413 Bleecker and asked them to show me how to do my makeup. It was nothing short of incredible. During the complimentary appointment the stylist stripped away every misconception I’d had about makeup, contouring, and even my eyebrows. We took off every little bit of makeup I had and built up a beautiful look that was simple, pretty and not hard to replicate at home. When my appointment was over I got a face chart that looks similar to the samples below, showing where each piece of the puzzle went. My stylist also wrote me a detailed email explaining how to apply each product which has been immensely helpful.
I also post the results to my Instagram fairly often. Here are some of the makeup looks NARS has helped me create: Look 1 // Look 2 // Look 3 // Look 4
The question I get asked the most is “Do I have to pay to have someone show me how to put makeup on?” The answer is, if you just want to be shown once, no. If you walk into any makeup store, whether it’s NARS or MAC or Sephora or wherever no one is going to charge a first-time customer who wants help. You could probably get away with going in once per season for a gratis lesson — after all, the employees are there because they love doing makeup. But if you’re not comfortable doing makeup at home I highly recommend investing in lessons. Since my initial NARS appointment I’ve been going back regularly for makeup lessons, which cost $85 per session. The investment is worth it to me because I’m now at the point where I use NARS items for just about everything (with a little Neutrogena, Tom Ford, Serge Lutens and Dior thrown in) so it’s logical to work with a professional who will use the same products I do at home. If you like a certain brand ask if they offer lessons in-store. If not, there are plenty of professionals who use multiple brands that will come to your home. Oftentimes they work at department store counters.
So, how do I go about my makeup? Let’s dig in. First I’ll go through the full process and then discuss some simpler routines that also work well.
Before makeup application even gets rolling I need to prep my skin. I shower at night and use this Neutrogena Face Wash. Let me tell you, it has been a long and winding road to find the right face wash. I could write a whole other post just about that! The short version is this: as a kiddo until about age 24 I rode horses, except that I’m also a bit allergic to horses so my face would get red and irritated when I spent the whole day at the barn. And then my face wash would make it even worse. I moved from humidity (NYC) to dryness (Colorado) and then back. When I came back to NYC it took me years to find a face wash that worked on my combination oily and dry face without stripping my skin. Finally I’ve found this Neutrogena stuff which I love! I use about a quarter-sized dollop and leave it on for a good thirty seconds. You’ll feel a cool tingling sensation when it’s ready to rinse off.
After the shower I use Neutrogena’s Night Calming Moisturizing Towelettes. There’s a more basic version of the same towelettes in a blue package. I like this purple package kind because it has a faint smell of lavender which helps me chill before bedtime. (The towelettes are also great to carry around in the summer on those dripping hot days.)
And then the NARS process begins. I’ve included affiliate links both to Sephora and to the NARS website. I recommend hitting the NARS website even if you don’t make your purchase there as they have very helpful tips on how to apply each product.
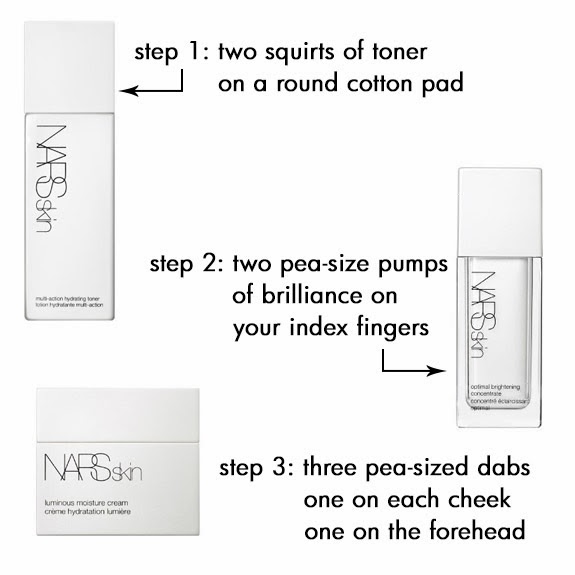
These three NARS skin products are like a spa treatment every night. First up is Step 1, the Multi-Action Hydrating toner (NARS official // Sephora). Using a round cotton pad I squirt two pumps of the toner and massage my face using small circular motions. This stuff pulls out dead skin cells like no other. It’s not harsh at all — no burning sensation; it feels rather cool. I concentrate my efforts around each nostril as well as the area between my eyebrows where dead skin tends to accumulate.
For Step 2 I use two pea-sized pumps of the Optimal Brightening Concentrate (NARS official // Sephora) on each index finger. You want to make sure to use the pad of your fingers and not rub your hands together — otherwise the pearly brilliance ends up on your hands and not your face! I rub the cream into my face in large circular motions, concentrating on my cheeks, temple and jawline. If you feel like three products are too much this is the one I’d skip though it adds a beautiful luminescence to your face.
And finally Step 3 is the Luminous Moisture Cream (NARS official // Sephora), which is also available in an oil-free version (NARS official // Sephora). I put one pea-sized dab on each cheek with my fingers and then one final dab on my forehead. Then I rub it in from the center of my face out towards the edges, paying most attention to the dryest areas. You really don’t want to use a lot of this stuff — it’s super moisturized and you’ll end up wanting to wipe off the excess if you use too much! Three small dollops will do.
This may sound like a lot but the whole post-shower process takes maybe 5 minutes. I like doing this process the night before because I wake up ready to apply my makeup — unless it’s a running day in which case I shower mid-morning. Applying these products at night allows them to sink in while I sleep when the pores are more open. Are there nights that I come home and just flop into bed? Absolutely. But if I skip this process for say, a week, I notice a negative impact on my skin’s luster and sometimes break out. So it’s worth it to me to make this part of my routine as often as possible. I’ve yet to run out of any of these three over 6 months after buying them. For a luxury brand they are an excellent value.
Skipping skin care is a terrible idea. No matter what you use make sure you’re using it consistently. It’s important to make sure you’re wearing either moisturizer or foundation or something with at least SPF 15 in it year-round to protect yourself from the sun. It doesn’t have to be sunny to damage your skin, especially sensitive facial skin.
Come morning it’s makeup time! Everything from here on out is my winter makeup routine. In the warmer months I use much less. During this enduring coldness I wear more to keep my face looking fresh. But not so much more that it looks caked on. Sometimes I do my eye makeup first — that way if anything falls on my face I can wipe it away before I put on foundation. But most mornings I do foundation first so we’ll start there.
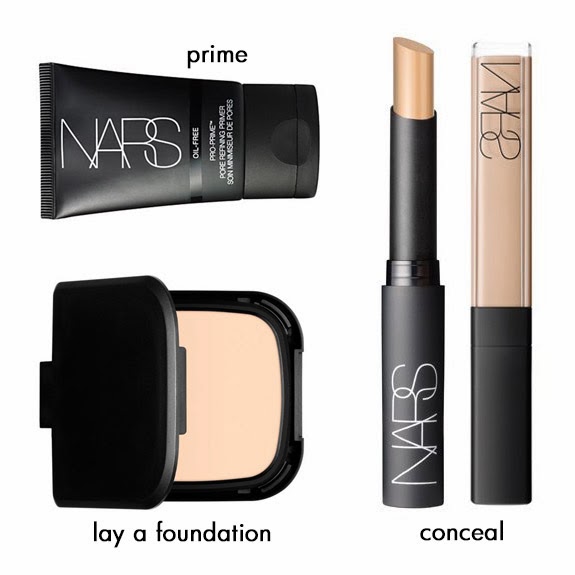
At every one of my makeup lessons the stylist always recommends I buy the Primer (NARS official // Sephora) but, well, I have yet to actually buy it. The main point of makeup primer is to help the makeup look last longer — theoretically you shouldn’t need an afternoon re-apply of your face. While it always works out that way when the NARS pros do my makeup I’ve yet to make it through a day on my own without needing a makeup fresh-up in the afternoon. So I haven’t bought this stuff yet.
My face begins with concealer. I have a the liquid concealer in vanilla (NARS official // Sephora) and a stick of it (NARS official // Sephora) that I carry in my purse. To apply the concealer under my eyes, I place three dabs from the interior corner of my eye to about the middle. Then I use my index finger to blend towards my nose and upwards. Never blend concealer outwards — you’ll end up looking much older. If you have excess gently wipe it off with a round cotton pad or your finger. I also apply concealer around my nostrils as that area tends to be red in the winter. (Thanks coldness!)
Here’s a cool trick I learned: up until your early 20s, your lipline tends to be naturally tight. Over time it gets less defined. If you apply a line of concealer along the upper and lower lips and blend the concealer in downwards, it will help you re-create that tight lipline when you apply your lipstick/gloss/whatever, no lip pencil needed. I love this trick.
Rounding out this part of my routine is the radiant cream foundation compact (NARS official // Sephora). I use Mont Blanc on my fair skin. The jury is out on whether it’s better to apply this stuff with a sponge or your fingers. I’ve been told one or the other is better depending on who I work with. I typically use my fingers. I draw an inverted vee from the bridge of my nose and then blend the lines of foundation outwards towards my ears. One more line is drawn and blended across my forehead and then one final line on my chin which is blended downwards. In the spring and summer I’d use tinted moisturizer rather than any foundation.
OPTIONAL PRODUCTS:
In addition to foundation, I like to wear bronzer and blush. Yes bronzer. In the winter. I have a longer face and a bit of bronzer in the deepest part of my cheeks helps to make my face look a little shorter and a little rounder. It balances me, in other words. I’m very partial to NARS’s Laguna (NARS official // Sephora), which is very popular among the bloggie set. To apply the bronzer I use a brush that’s no longer available, the Kabuki Artisan No. 21 brush. Here’s what it looks like. You’ll want to use a similar brush that’s long and lean. Dip the brush in the bronzer and then without lifting the brush from your cheek apply the bronzer in back-and-forth strokes under the top of your cheekbone. For blush, in the winter I like NARS’s Daydream which was a limited edition and in the summer I’ve been using Orgasm (NARS official // Sephora), which has a touch of shimmer.
It’s easiest to think of the application this way: bronzer goes in the places shadows would hit if the sun were directly on your face. Blush goes where the sun would hit. (This is especially helpful in the spring and summer.) If you’re having a hard time picturing this it’s well worth it to set aside 10 minutes and watch this fantastic video tutorial by Lisa Eldridge.
Next up are my eyes. No, I don’t use all of the products in the spread above in a single day. It’s the array of choices in my NARS arsenal. Number 1 above is Bali (NARS official // Sephora), a color which works great in the crease of your eye as well as along the outer edges if you want to do a smokey eye. (Here’s a great smokey eye tutorial video.) The color works well with all the other palettes shown.
In the spring & summer I use a combination of Number 2 above Abyssinia (NARS official // Sephora) and Number 3 above Nepal (NARS official // Sephora). Nepal goes on first, covering entire eyeball. Then I sweep Abyssinia over it. In the winter, I mainly use the Kalahari Eyeshadow Duo (NARS official // Sephora) in Number 5 above. The right-hand color goes over the entire eyeball and then the left-hand color goes just along the lid you can see when your eye is open.
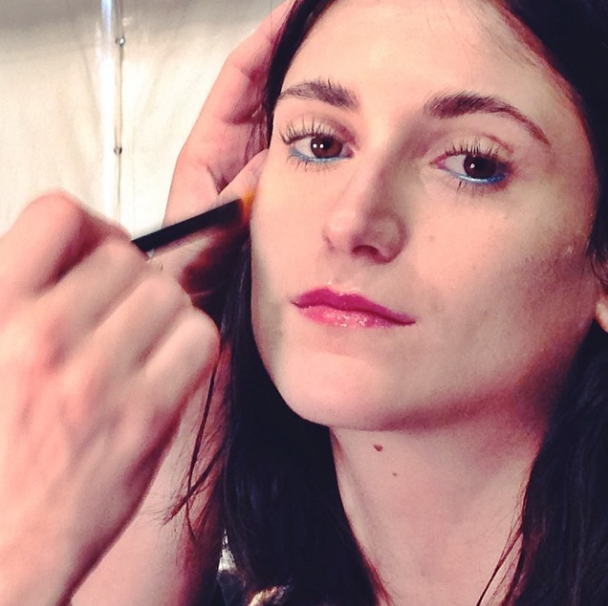
During my last makeup tutorial session my stylist, who has the same fair complexion and dark, dark brown hair as me was wearing the combination of Bali (NARS official // Sephora) — again, Number 1 above — and the left-hand gold color from the Kauai Duo Palette (NARS official // Sephora) shown in Number 4 above. I sweep Bali over my eyeball and then line the visible ridge with the gold from the Kauai palette and WOW. It’s rather incredible. It’s subtle unless you’re very close — not overly sparkly from a distance. Here’s how it looked at the end up my appointment, this photo was also at the top of the post.
In addition to these palettes I also own Dior’s Romantic 5-color palette in nude pink which is amazing for a romantic eye (this video tutorial aces it) and Serge Lutens Barney’s Eye Palette.
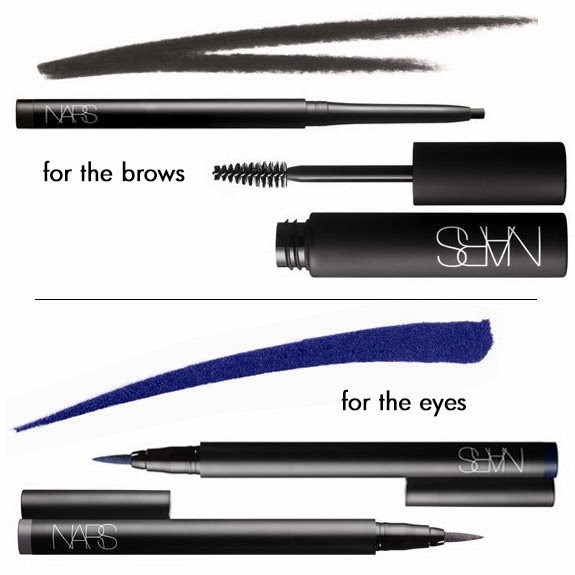
We’re not quite done with eyes yet. Although I have naturally long lashes (upon which I typically put Diorshow mascara), a tight line of eyeliner makes the eye look even better. For all of the NARS palettes I showed above I usually line with NARS Koala liquid Stylo (NARS official // Sephora). Sometimes though I want something more fun and on those days or evenings I’ll use the sapphire blue Atlantic Stylo (NARS official // Sephora) instead. (Sweep of color shown above.) The darker blue brings out the green and gold in my hazel eyes nicely.
Before leaving the eye area I groom my brows. It sounds so silly but brow shape can make all the difference as I’ve learned. Keiko Lynn recently did a fantastic brow tutorial. Read it! One of the NARS pros doubles as an incredible, incredible eyebrow shaper. He took my brows from angry roxy to romantic roxy effortlessly. I’m still in awe. At home, I use the NARS Brow Gel (NARS official // Nordstrom) and the Brow Perfector in Suriname (NARS official // Nordstrom). The gel shapes the brow and the perfector allows you to fill in any gaps and add additional shape definition.
With this, my eyes are now complete.
Lips are probably my favorite part of the makeup process. There is nothing better than kissing my boyfriend before we part at the subway and leaving a little lipmark on his face as the last smooch. (He may not agree, but well, he loves me and so he’s gracious about it.)
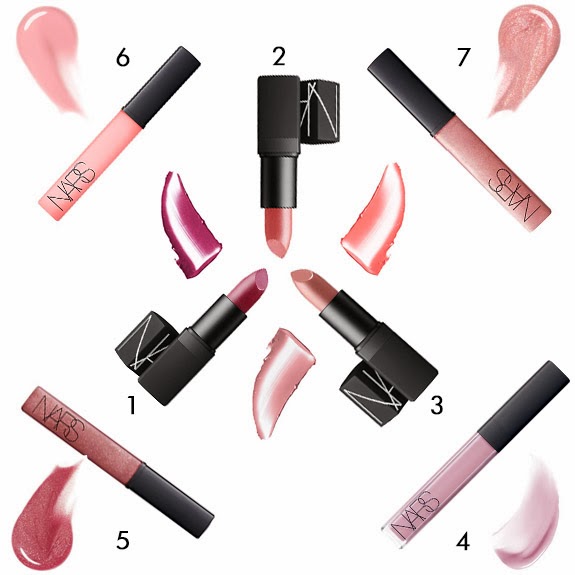
Most days I wear a combination of lipstick — Numbers 1 through 3 in the graphic above — and a complementing lip gloss over it. In the summer I might just do gloss. In the winter I might just do the lipstick. So many choices! And they are all grand. I should note that my lips have a pinkish-purple base to them so I tend to like richer pinks and nudes.
If you only buy one thing I mention in this entire post, make it the NARS Lip Gloss in Turkish Delight. (NARS official // Sephora), which is Number 6 above in the top left corner. This creamy pink makes anyone’s lips look appealingly kissable. Just a warning, you will be irresistible. I have scientific evidence to back this up.
In the winter, most days I wear a combination of Number 1 NARS Sheer Lipstick in Shrinagar (NARS official // Sephora) with Number 5 above Lipgloss in Risky Business (NARS official // Nordstrom). However, on days when I’m pitching a new client or if I have a serious business meeting I’ll stick to the appealingly nude palette of Number 3 Cruising Sheer Lipstick (NARS official // Sephora) with Number 4 Larger Than Life Lip Gloss in Born This Way (NARS official // Sephora). The combination is understated and elegant. The remaining items are mostly worn in spring and summer.
In addition to all these choices, I also love Tom Ford’s Vanilla Suede and Serge Lutens’s Mauve de Swann.
FINISHING TOUCH
After all this work the last thing I want is to be retouching my makeup every 2 hours. I have found that laying a thin layer of the NARS Light Reflecting Pressed Powder (NARS official // Sephora) really helps to lock everything in. I only have to retouch my nose and that’s because my nose is always red. Always.
All in all, my entire makeup routine takes about 15 minutes. It took me much, much longer to write this post than it does for me to do my makeup each morning.
WANT A SIMPLER ROUTINE?
For the gal on the run, NARS’s Matte Multiple (NARS official // Sephora) is an amazing time saver. You can use it as eyeshadow, blush, lipstick, pretty much anything. Wet it down for a sleeker look.
RECOMMENDING READING/VIEWING
I mentioned both Lisa Eldridge and Keiko Lynn in this post — Ms. Eldridge’s video makeup application tutorials are amazing and Keiko Lynn’s makeup tutorial posts are easy to follow and filled with lots of photos to help you visualize the technique.
That’s it, my entire makeup routine! Whew. I’d love to hear what products you love (you are welcome to link in the comments). Was this post helpful? I don’t talk about hair or makeup much as it’s mostly peripheral to my shopping hobby but I am happy to keep subjects like this in mind for the future if there’s community interest.


It’s always nice to have an expert show us how to do makeup the right way … If only I could afford a stylist and makeup artist to help me get ready each morning 🙂
Thanks for sharing!
Hailey