Please join me in welcoming Alicia from Les Arts Plastiques, who today will share with us her DIY Embellished Collar Necklace project!
What you’ll need:
- Assorted Plastic Beads
- Fabric/Doily/Lace
- Scissors
- E600 or Glue Gun
- Safety Pins
- A Sheet of Paper
- Ribbon- 2 pieces, about 11 inches each
- Various Small Round Dishes-Plate/Bowl
- Pen
And now for the project steps. (You may click on the photo below to see a larger version.)
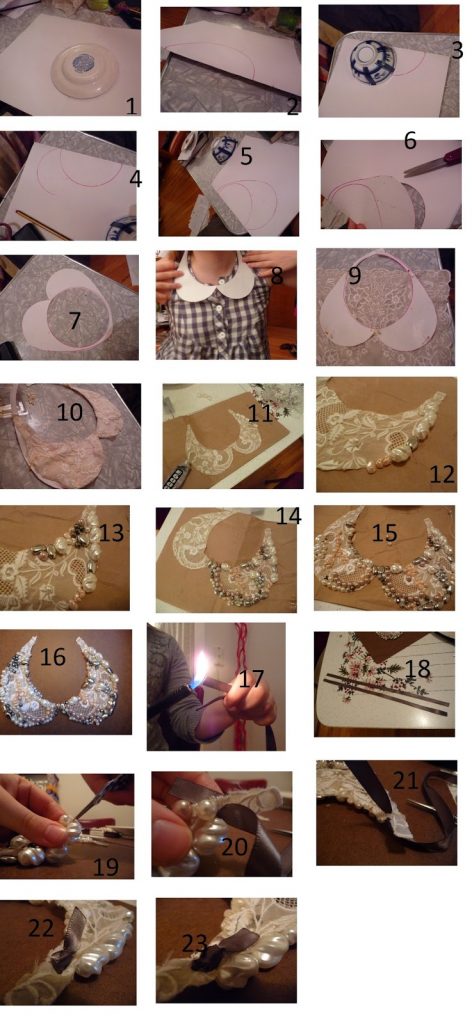
1. Trace a small plate on a sheet of paper.
2. Fold paper in half.
3. Use a small bowl to trace shape of collar.
4. “”
5. Free hand trace the line so it joins your circle.
6. Cut it out.
7. Admire it.
8. Try it on; make sure it’s not ridiculously large.
9. Pin it to your doily/fabric/lace.
10. Cut it out carefully. If you don’t do a good job on step 10…well, as you can see I didn’t pin one half very well…so I ended up with this wobbly side. It’s ok, we fix this in 11.
11. In order to even out the appearance, use your beads cleverly—glue them along the edge to ‘fatten’ the curve and even out the shape.
12. “” & Do not bead all the way up the neck of each side of the bib—you’ll need this fabric bead-free later.
13. Continue gluing beads, while you are placing them randomly, remember the inside and outside edges need continuous coverage.
14. Try to cluster beads by colour.
15. Try to repeat some parts of the pattern on both sides for some level of continuity…like in the center.
16. All done beading. While E600 takes a very short time to dry, it’s best to leave it dry overnight. Be patient. Also, if you’ve never worked with E600 before and the fumes start to get to you a bit and you think you’re getting high…well you probably are. Crack a window. Abort the E600 if it’s making you feel skeeved out—especially understandable with the ‘known to the state of California to cause cancer’ bit on the label. Go ahead and use a glue gun instead. What, I should have mentioned this around step 11? OH SORRY.
17. OK, you’ve cut 2 pieces of ribbon for the ties, but you don’t want them to get frizzed and frazzled (alliteration)—time to take a lighter to the ends.
18. There they are—of equal length!
19. Take the bit of fabric you left bare at the neck and fold it over. Take a pair of scissors and snip a little vertical slit into the fabric.
20. Pull the ribbon thru the hole.
21. “”
22. Tie a knot.
23. Glue that knot and the excess ribbon down. Flip over to the front of the collar, and glue the ribbon that overlaps with the neck down as well. Repeat steps 19-23 on each side.


